Showing posts with label photography lesson. Show all posts

Newborn Photography To Capture The Moment


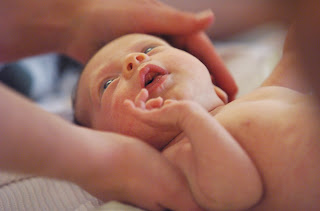
The baby is finally here, and everyone wants pictures! But every time you try to take pictures, your beautiful baby looks like a little wrinkly old person instead of that exquisite being you see before you. That is why many people consider hiring a photographer to take beautiful newborn photography . Well - you can do it yourself. You just need to learn my secret. Here are some tips to capture your newborn for the best results.

- First things first - Turn off the Flash! Use window light for the best natural soft light to show off your baby. Find a window that has an abundance of good light

- not direct sun light streaming in, but good indirect sunlight.

- Remove clutter from the background of your shot by putting the baby in a carrier with a solid colored blanket covering it, or on the bed with white sheets.

- Remove the babies clothing down to the diapers. Less clothing is better for newborn photography to really show the baby as they tend to not fit clothing well at this age, and clothing is more of a distraction. If the diapers have cartoons on them, try to cover the cartoons by folding the diaper over, or putting fabric over that area - or take your chances and remove that diaper! Work quickly at this point if you choose this route.

- With your camera ready, making sure the babies face and body is turned toward the light from the window, start taking pictures from different angles. Try to fill the frame with the baby and the solid colored blanket or sheet - avoiding additional clutter or items that may get into your background. Do not try to get the baby to smile - just take a series of images from different angles, with some of the baby looking at the camera and some of the baby's profile, some of the top of the head etc. Keep working your way around the baby talking and singing to your baby to try to engage them. If the baby starts fussing, soothe them as needed and when they are calm, try again. If they fall asleep - no problem - photograph them while sleeping! Take more pictures than you think you need - you never know which ones you will like. Make sure to get come full body, some half body and some close ups of face, hands, feet and other cute, memorable body parts - like the fuzzy wrinkly shoulders, funny hair lines, and more.

- Now it is time to develop the images- whether on your computer or at the lab, develop your newborn photography pictures and then sit down and go through them, looking with an artistic eye to choose the ones that capture the baby that you see, and this time in your life.

Study Photography Today


Many keen and budding photographers feel that taking a photography course is the best way to help them study photography , improve their photography and ultimately the quality of the photographs they take. In this article I set out some of the key things to look out for when choosing a course. So, if you want to improve your photography then this may be one of the most important articles you will read for a long time.

The best courses are a mix of theoretical study and practical application. In order to learn the most you need to be given a chance to implement and practice the things you learn so choosing a course with a focus on practical training is a must. Any successful photographer will tell you that you can read all the books in the world but the time when you learn the most.

From experience the best kind of course for photographers to take is some sort of home study course. Doing such a course allows you to study in your own time and fit your study and shooting around the rest of your life. With classroom based training it is all to easy to miss a few classes here and there and miss out on valuable learning that you have paid for.

Another key benefit of home study photography courses is that they tend to be a lot cheaper than classroom based photography courses. The lack of classroom and physical support means that in general home courses cost on average of one tenth the cost of classroom based courses.

Do you want to learn to improve your photography but don't have the time or money to attend a photography course? This is a situation virtually all photographers have found themselves in at some point or another. In this article I'll discuss some of the benefits of studying a photography course from home and tell you how to find the best one for you.

I hear all the time from amateur photographers that have taken the plunge into the world of photography by buying a digital SLR camera. Often after a few months of great photographs people get frustrated or even disillusioned that they seem unable to take their photography to the next level. It is not uncommon to feel that the money spent on your SLR camera was wasted and maybe you should have stuck to your compact digital.

There are many photography courses run all over that aim to help you improve your skills however many of us are unable to afford the high course fees or take the time off work to attend the often multi day courses. Well the simple solution is to take a home photography course.

Benefits to Study Photography at home:

There are two main benefits to these types of course:
Time - As you are not committed to attend college courses you are free to study in your own time. You can fit your photographic studies around you job, family, social life etc as you see fit.

Cost - By their nature home study courses in photography tend to be much cheaper than class based ones. The main reason for this is the course provider has no overheads such as classroom hire, enabling them to offer their services at a much lower price.

Choosing the right course can be a difficult process so it is best to look at some reviews first.

Space Photography


Today I'm going to discuss space photography . No I am not talking about the dark black area above us that we see at night. I am talking about the space of the photograph within the borders of the photo. You see there are various areas that you can use the space in your photograph. If you know how to use the space in your photo right you can take much better shots. If you don't use the space right you can end up with photos that just seem off and are not visually pleasing.

First off, there are two different types of space when it comes to photography.

Negative Space

This type of space is the space that is in relation to the object of importance of the image but not the object itself. The negative space is the are on the photo that does not include the object or focal point of interest. For example, the negative space of a picture of a soccer ball with a white background is the white background.

Positive Space

I am really sure that you can guess what positive space is now that you know negative space. Yes, it is the space that comprises of the object or focal point of interest in the photograph. This area is where you are going to want your viewer to pay the most attention to.


Many photographers only pay attention to the positive space but in reality the negative space plays a major role in the photo as well. Knowing how to master the use of negative space can make the positive space that much more appealing. The amount of this negative area that you use can make your photo either look trapped and lacking in space or like its liberated and open.

The background of the subject can have a very large role in the picture. The background is the negative space and usually does one of two things in photography. It either is neutral and blank or it is filled with things that contribute to the object of importance.

The use of the space in your photograph is what can really make your photo work or feel as if it is missing something. Experiment with this and do not be afraid to try different things out.

Digital photography has lots of different components to it. There are the technical parts and the compositional parts. And in these compositional parts there is another part...the space. Space is something that can make or break a photo when used. You can use it to take much better shots. This article will show you digital photography tips for using space right.

What are these different types of space?
There is, first off, negative space. This basically is all the space that is around the subject you are taking a picture of. All of your photos have negative space. Many people think of the space around the subject as unimportant but this is wrong. Using the negative properly can make for much more interesting shots.
For example, most people take shots and isolate the subject to a blank background. This makes the shot simple and more compositionally sound. However, a blank background does nothing to add more meaning to the photo. It in no way helps define the message and concept of the photo.

Using negative space properly can make for much better shots. Proper use of this space can make your photos much more powerful and captivating. For example, if you have a photo of a person praying behind a blank background it'll look fine. However, put the subject behind a war field or a church and the surrounding space adds more meaning.

Positive space is also important. This is the space that comprises of the subject of interest. You can use lots of this space or a little. Using a photo that is mostly positively spaced will make the subject look much closer and intimate. A shot with little positive space will make the subject look less important and less powerful.

Space photography is very important. The space of your photo is very strong and will be the matter of getting the right pictures. Practice and you will start seeing that this is true.

Photography Lesson


Are you looking for Photography Lesson 101 ? Then you've got the best place right now.
Here are some tips for you to begin photography:

Keep an eye on the weather
Weather conditions can play a big part in setting the mood of your shot. Rather than waiting for the bright light of the midday sun, a misty morning in a forest can be the perfect time of day for that mood-shot.

Take your time to choose the subject
Take your time to choose the subject, then spend time walking around the subject looking for the best angle and lighting.

Take your time to set up the shot
Don't be afraid to take your time to set up your shot. Although it can get a bit frustrating if you have your loved ones tagging along and they're sitting and waiting impatiently for 20 minutes for you to take a single shot of a piece of driftwood on the beach!

Don't always choose brightly-coloured subjects
Subjects with muted colours can sometimes produce excellent results. A field of wheat of similar yellow-brown colour can produce striking results when accompanied by a low-sun and long shadows.

Movement diffusion
If you have a camera that allows you to shoot with a manual shutter speed - try slowing the speed and increasing the F-stop. Then move your camera when taking the shot. Some very effective arty-type images can be produced with blur effects.

Overexpose your subject
Not too good to do all the time, but experiment with results by over-exposing the subject.

Try macro photography
Grab a magnifying glass and see if you can focus your camera through the glass onto a small subject. It just may work! And may open up a whole new range of subjects for you!

Shoot through wet glass
Try spraying water onto a window, then take a shot through the window to a subject outside. (wet the outside of the window - not the inside of your home!).

Color balance
Try balancing color by having subject and the surrounding detail in similar colors. This is the best photography lesson you need to remember.

Silhouettes
Silhouettes usually have a small range of colours, but can produce some of the most beautiful images. Shooting a silhouette involves having the background brighter then the subject in the foreground.

Experiment with patterns
We've all seen those amazing images of the red and orange leaves of maple trees in the fall/autumn. Thousands of leaves - all of a similar shape and colour - but very awe-inspiring and beautiful.

Compliment colours
Two strikingly-different colours can be beautiful too. Picture an image of your girlfriend or wife in a red dress sitting on a field of green grass. Or your boyfriend or husband in a red shirt walking through a field of waist-high wheat stalks. Complimentary colours that will bring more attention to the subject.

Use a colour filter
If your camera can be fitted with coloured filters - try your hand. Although this effect can be made quite easily these days with photo and image-editing software.

Sunrise is better than sunset
Wake up before sunrise one day and go on a photography expedition. If you've not done it before you'll be pleasantly-surprised by the contrasting light and shadows. But remember you'll only have a very short window of time in which to shoot (usually less than an hour) before the sun rises too high and you lose the light.

Use a flash in daylight
Use your flash during the daytime to fill a close subject with light. This will produce better results where the background is brighter than your subject and the automatic shutter speed on your camera shoots too fast to effectively show the detail of your subject.

Childrens Photography


In my work as a pro photographer I would guess that a good 70% of my images are of children. As a result I have discovered various methods of achieving the completely natural images that people love. There are many things to remember when trying to do childrens photography . First of all, you need to have so much patience. There are some methods that work and some that don’t, here are a few hints that I have learned along the way.

Don’t rush into things
Children can be very shy at first and it takes a real skill to get a child’s trust in a short period of time. I have an advantage over studio photographers in that I regularly shoot out doors (about 95% of the time). This means I can often meet the children at there home or a place familiar to them which makes it easier for the child to be relaxed. Having arrived at the location I set about gaining the child’s trust and breaking down the shy barriers. This is essential if I want to capture the completely natural images I have made my name on. I never take the camera equipment in to the house straight away. I’ll leave it in the car until I feel the child is ready. This also helps the parents to settle down. Its important to realise each little one is an individual and as such there is no hard and fast rule of how to treat any of them.

Timing
Not only is your timing of each shot vital but also the time of the day. Children normally run on a routine that involves sleep, food, drink and play. If you schedule the shoot to take place in anything other than a child’s natural play time you are asking for trouble.

It should be fun for all involved
If you want to capture natural expressions of joy (and who wouldn’t) then the only way to achieve this is to make it fun. Depending on the age group the way this can be achieved differs but the basic guideline is, you play by their rules. Find something that would entertain them. For example for 0-4 year olds can be easily distracted with a bubble machine. For over 4’s perhaps a kite or remote control car something that is both colourful and enjoyable. What you are aiming to achieve is a happy child who soon forgets about the camera and really is having great fun.

Don’t force things
As any parent will tell you trying to get a child to do something they don’t want to do is as close to impossible as things get. You can guarantee tantrums and tears follow if a child is forced into doing something they’ve decided they don’t want too. The trick is to get them to want to do whatever it may be. Constant praise is all that should come from the photographer on how well they are doing. When I’m photographing children and for whatever reason they decide that they’re not going to lie down / kneel or even stand I try once and then move on to something else. Ten or twenty minutes later I’ll come back to the original pose and try it again, nine times out of ten this will succeed as the child has forgotten about not wanting to do whatever it was and we get the shot. As is mentioned before, you’re playing by their rules. Childrens photography is all about them and not about you.

Be prepared
You never know what each second holds when photographing children especially when you’re outside. Many things can make fantastic photographs, throwing stones into a lake, patting a dog, throwing leaves all this and more. If you switch your camera off and put your lens cap on it’s a sure way to miss fantastic unscripted moments.

I hope these points have made sense and will help you next time you take on the challenge of photographing children. I wish you fantastic luck.

Selling Photography


Anyone with the ability to use a camera correctly has the potential to go on the business of selling photography . Picture agencies handle images of every subject and are always looking for emerging talent.

Pictures libraries and stock agencies are in the business of selling images. The don’t give you advice on how to take better images. Their purpose is business - they sell images to magazines, book publishers, the travel industry and many other industries that use images.

Many photographers look upon agencies as a last resort to sell their work; if you have been unable to sell any of your images, the chances are that most agencies won’t accept them.

If you are interested in an agency selling your images, you must be able to produce high quality images which are suited to the agencies market. Check out their website to view samples that are currently in use.

If you feel your work meets their standards and suits their customers - then approach them by e-mail or by standard mail. But, before placing your work at an agency make a short-list of the agencies that seem to suit your work. Contact each agency outlining your work and which magazines have already published your images. If an agency is then interested they will ask you to send them samples.

If an agency accepts your work, don’t take this as a guarantee that your images will sell.

Don’t approach an agency until you have a large collection of images. Minimum first submissions can consist of anything from 50 images to 500 and regular submissions are normally required thereafter. Most agencies work on a commission basis - 50 % being the standard rate. If an image sells for two hundred euro - the photographer receives a one hundred euro fee.

When an agency takes on a photographer’s work, they normally require a four or five year retention period. Agencies normally sell the reproduction rights of a pictures - the image being licensed to a buyer for a specified purpose.

It may take as long as six months before an agency sells a picture belonging to you. First they need to scan your images if they are submitted by film; then they need to contact their clients and let them know that there is new material available - all of this takes time, so you must look at supplying a picture agency as a long term investment. It is only when you have several hundred images placed in a library that you’ll start to see regular sales on your selling photography .

Remember: agencies can’t sell images if there isn’t a market for them and placing images at an agency does not guarantee you sales.